In today’s video, we’ll go over how to install a chain link gate onto posts that you’ve already installed. The first thing you need is a gate kit. Here’s what you’ll find inside the kit:
- Two sets of post collars
- Two hinge bolts
- Two frame collars
- A latch catch
- A gate finger
Now, let’s go through the steps for assembly and installation.
1. Assemble the Gate Kit
The assembly is simple:
- Take a post collar, insert it through the hinge bolt, and secure it with both nuts. Repeat this process for the second post collar.
- Do the same with the frame collars. You’ll need to repeat this four times in total since there are two frame collars.
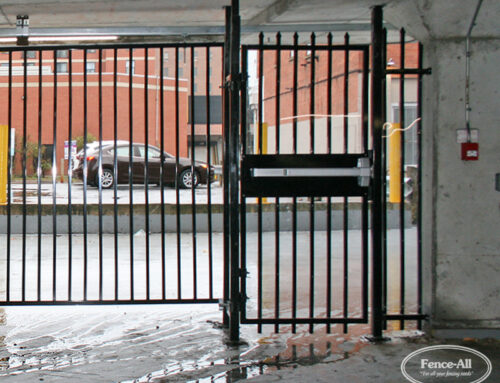
2. Installing the Post Collars
Once assembled, it’s time to install the gate.
- Place the post collars onto the post where you want the gate to hinge. We want the gate to hinge off the post and swing towards us.
- Position the post collar so it’s in the middle of the hinge bolt for adjustability. Hold the gate up to ensure the post collar is at the right height before tightening.
- Spread the post collars as far apart as possible—one at the top and one at the bottom. This makes the gate stronger.
- Ensure the top hinge bolt is pointed downward, and the bottom hinge bolt is pointed upward to prevent someone from pulling off the gate and stealing it.
3. Installing the Frame Collars
Now that the post collars are secured, it’s time to install the frame collars, which attach the gate to the hinge bolts.
- First, place the post collars and frame collars on the side of the gate that will connect to the hinge bolt.
- Slide the lower frame collar onto the bottom hinge bolt first, then tighten it. Afterward, attach the top frame collar.
- Adjust the gap between the post and gate as necessary. Keep tightening the bolts and ensure the gate remains level during this process. It’s important to prevent the gate from becoming crooked.
4. Installing the Latch Catch
The next step is to install the latch catch.
- Slide the latch catch over the post, ensuring the small hole at the bottom is aligned for the lock. Don’t install it upside down.
- Set the latch catch and gate finger at your desired height. The gate finger should be slightly angled to latch properly.
- Tighten everything securely.
Common Mistakes to Avoid
- Incorrect Hinge Bolt Directions:
Ensure the top hinge bolt faces down and the bottom one faces up. Otherwise, someone could pull the gate off the hinge bolt. - Misaligned Frame Collars:
Frame collars should face the correct direction. If they don’t, it may seem like the gate or posts are the wrong size. - Straight Gate Finger:
The gate finger should be at an angle, not straight. This ensures proper latching.
“For all your fence, deck, and railing needs”